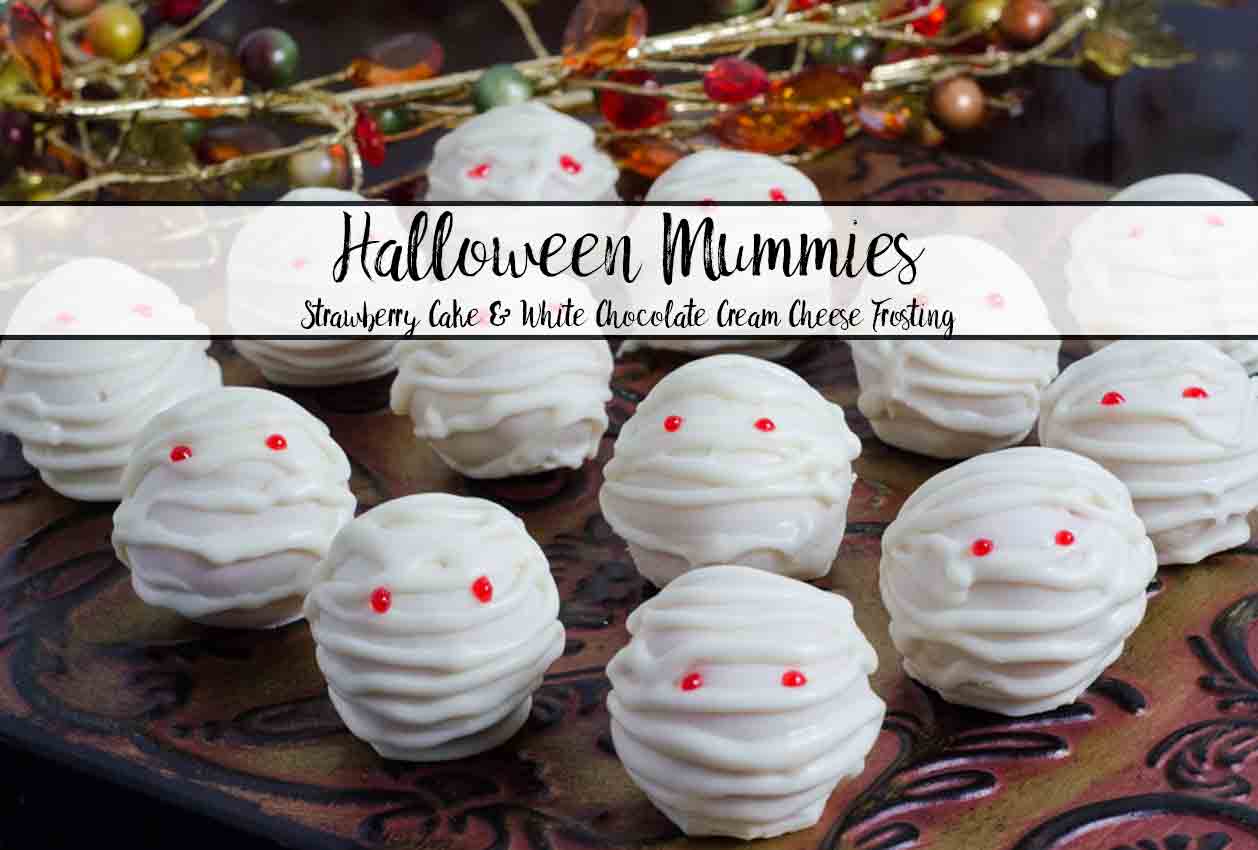
Halloween is my favorite holiday. I especially love all of the cute and delicious food. These Halloween mummies are delicious: strawberry cake mixed with white chocolate cream cheese frosting. Dipped and decorated, they look great on any Halloween table.
One of the best parts is that it doesn’t matter if you’ve had bad luck with cake pops: these don’t need to look perfect. Covering them up with the mummy “wrappings” covers up any little errors.
These were part of the the giant edible Halloween Landscape that I made last year, which also included buck”eyes” and “ghosts” among other things.
For more labels like the one in the “Mummy Meadow” picture below, check out the post “Free Printable Halloween Labels: Multiple Sizes, Multiple Designs.“

Cake Bites:
The first step is making the cake bites (basically cake pops but without the stick).
1. As always, with cake pops, go ahead and use boxed cake mix. But include the tips for making it taste better: use melted butter instead of oil, add an extra egg, and use milk instead of water.
2. After the cake is cooled, don’t just crumble it up. First, cut off the edges. Scrape off a very thin layer of the top. Flip over (can do in sections). Scrape a very thin layer off the bottom. Then crumble it up very well.
3. Make frosting. Note that you can make the frosting ahead of time and chill until you want to use it. When you need to use it, pull it out, and give it a quick whisk (add a tablespoon of milk if needed). The frosting I normally use is “White Chocolate Cream Cheese Frosting.”
As always, you CAN use store-bought. But this is one area in cake bites where you can taste the difference- the frosting. If you end up using store-bought frosting, you can make it a bit better. Mix in a teaspoon or so of good-quality vanilla extract; whip them together well. Trust me, you would not believe the difference. Doesn’t quite taste homemade, but it’s better.
4. Make the cake bites: Mix approximately 1/2 cup of frosting into entire crumbled cake. I use my hands, but you can use a fork if you’d prefer.
5. To form: scoop up enough mix to make 1″ ball, squash it together, then roll the ball back and forth between your hands. This will do a few things:
• If your mix doesn’t have enough frosting to hold it together, the rolling will cause it to crumble apart.
• Makes a perfectly round shape.
• Provides a very smooth outside for dipping.
6. Chill for 2 hours (minimum of 10 minutes is *required*).


Dipping:
1. Melt the chocolate. A microwave works perfectly fine, you don’t need a double-boiler. Heat for 30 sec. at 50% power. Stir well. Even if nothing looks melted, stir the wafers.
2. Continue to heat at 30 second increments, always 50% power, until chocolate melted. Stir well between each heating cycle. Feel free to stir and let it sit a minute or so, then stir even more. You would not believe how much the chocolate will melt as you stir (as the heat gets distributed). Always error on the side of waiting a bit before another heating cycle. Your bowl should never be too hot to touch with your bare hands.
3. After the chocolate is mostly melted, dump in another handful of wafers. Stir them in, using the heat already in the chocolate and bowl to melt them. Keep stirring…they will melt. If necessary, heat 10 seconds at 50% power.
Note: Do NOT overheat. It is a bit counter-intuitive: normally if you heat something up, it becomes runnier. However, with this, if you heat it too long, it scorches, clumps, and becomes less runny. Chocolate scorches very easily.


4. Remove the cake bites from refrigerator and let sit at room temperature for a few minutes. This both lets them warm up slightly and lets the chocolate cool slightly. A large temperature differential is the #1 reason for cake pops cracking. (For the mummies, since we’re wrapping them in white chocolate, this isn’t such a big deal)
5. Dip each chilled cake bite straight down into the melted coating until the cake ball is completely covered and sealed. If you need to angle the cake pop, gently tilt it in one direction and then another. Resist the temptation to stir the coating with the cake pop. If you do, your cake pop may fall off of the stick into a candy coating abyss. I used a thick lollipop stick. They fall off toothpicks too easily and this is one project where the “touch up” gets covered up!
6. Remove the cake pop from the melted coating by pulling it straight up. Then, turn the cake pop at an angle and gently tap off any excess coating. Don’t get fancy, keep it simple.
7. Set cake bite down on parchment paper. Using a toothpick to hold it in place, remove lollipop stick. Dab a little melted chocolate over the hole. (or simply allow to set with lollipop stick in place. Once set, remove stick and then dab melted chocolate over hole.)
8. Allow to set.


Decorating:
1. After set, trim off any excess chocolate around the base. Use finger to smooth any rough edges.
2. If there are any slight bumps or blemishes, either remove by pressing lightly and rubbing with finger -OR- just leave them: decorating them like mummies will cover them up.
3. Use a small decorating bags (I use the microwavable ones; it’s easiest), melt a small amount of white chips. Cut off the very end.
4. Holding the mummy by “the back of its head”, ribbon melted chocolate back and forth across the front of the mummy. Set it down. Ribbon chocolate back and forth across the top of its head. Don’t worry if it’s a little messy.
5. Repeat with all remaining mummies. Optional: After they are set, you can pipe chocolate back and forth across the “back” of the mummies too if you desire.
6. Using red decorating gel, dab little eyes onto mummies!
7. Impress everyone with your adorable and delicious strawberry and white chocolate cream cheese mummies!


Halloween “Mummies”: Strawberry Cake Bites Decorated as Mummies
Ingredients
- strawberry cake mix
- 3 eggs
- Melted butter amount of oil called for on box
- Milk amount of water called for on box
- white candy melts
- Red decorating gel
- 2 & 1/2-3 cups powdered sugar sifted
- 16 oz. cream cheese at room temperature
- 1/2 cup. unsalted butter at room temperature
- 1 Tbsp. vanilla extract
- 12 oz. baker’s white chocolate
Instructions
Cake Bites:
- As always, with cake pops, go ahead and use boxed cake mix. But include the tips for making it taste better: use melted butter instead of oil, add an extra egg, and use milk instead of water.
- After the cake is cooled, don’t just crumble it up. First, cut off the edges. Scrape off a very thin layer of the top. Flip over (can do in sections). Scrape a very thin layer off the bottom. Then crumble it up very well.
- Make the frosting*
- Make the cake bites: Mix approximately 1/2 cup of frosting into entire crumbled cake.
- To form: scoop up enough mix to make 1″ ball, squash it together, then roll the ball back and forth between your hands.
- Chill for 2 hours (minimum of 10 minutes is required).
Frosting:
- Set out cream cheese and butter and allow it to warm to room temperature.
- Sift the powdered sugar. Cream together room temperature cream cheese and butter. Scrape down bowl and make sure there are absolutely no lumps.
- Melt chocolate in microwave- 30 seconds at 50% power. Stir well. Microwave in additional 15 second increments, stirring every time, until melted. Do NOT overheat. Allow to cool slightly.
- Add melted chocolate and vanilla to cream cheese and butter. Mix well.
- Add sugar gradually, beating well, until light and fluffy after each addition. Add sugar to desired sweetness; may not use all of the sugar.
Dipping
- Melt the chocolate. Heat for 30 sec. at 50% power. Stir well. Even if nothing looks melted, stir the wafers.
- Continue to heat at 30 second increments, always 50% power, until chocolate melted. Stir well between each heating cycle.**
- After the chocolate is mostly melted, dump in another handful of wafers. Stir them in, using the heat already in the chocolate and bowl to melt them. Keep stirring…they will melt. If necessary, heat 10 seconds at 50% power.
- Remove the cake bites from refrigerator and let sit at room temperature for a few minutes. This both lets them warm up slightly and lets the chocolate cool slightly. A large temperature differential is the #1 reason for cake pops cracking. (For the mummies, since we’re wrapping them in white chocolate, this isn’t such a big deal)
- Dip each chilled cake bite straight down into the melted coating until the cake ball is completely covered and sealed. If you need to angle the cake pop, gently tilt it in one direction and then another.
- Remove the cake pop from the melted coating by pulling it straight up. Then, turn the cake pop at an angle and gently tap off any excess coating. Don’t get fancy, keep it simple.
- Set cake bite down on parchment paper. Using a toothpick to hold it in place, remove lollipop stick. Dab a little melted chocolate over the hole.
- Allow to set
Decorating
- After set, trim off any excess chocolate around the base. Use finger to smooth any rough edges.
- If there are any slight bumps or blemishes, either remove by pressing lightly and rubbing with finger -OR- just leave them: decorating them like mummies will cover them up.
- Use a small decorating bags (I use the microwavable ones; it’s easiest), melt a small amount of white chips. Cut off the very end.
- Holding the mummy by “the back of its head”, ribbon melted chocolate back and forth across the front of the mummy. Set it down. Ribbon chocolate back and forth across the top of its head. Don’t worry if it’s a little messy.
- Repeat with all remaining mummies. Optional: After they are set, you can pipe chocolate back and forth across the “back” of the mummies too if you desire.
- Using red decorating gel, dab little eyes onto mummies!
- Impress everyone with your adorable and delicious strawberry and white chocolate cream cheese mummies!
Notes
**Feel free to stir and let it sit a minute or so, then stir even more. You would not believe how much the chocolate will melt as you stir (as the heat gets distributed). Always error on the side of waiting a bit before another heating cycle. Your bowl should never be too hot to touch with your bare hands. Do NOT overheat. It is a bit counter-intuitive: normally if you heat something up, it becomes runnier. However, with this, if you heat it too long, it scorches, clumps, and becomes less runny. Chocolate scorches very easily.


Leave a Reply